 ZigBeeForDomoticZ plugin Wiki
How-To get devices well integrated with the plugin
Overview
It might happen that your device is well paired with the coordinator and the plugin, but does not behave as expected.
The plugin provides a way to overwrite the Zigbee standard behavior by adding specifics to the device plugin configuration.
Since plugin version 6.4.4xx, the device config files have moved out of the plugin core engine to a specific python module ( z4d-certified-devices ). This allows more frequent updates of config files without touching the plugin core engine.
The source code of the z4d-certified-devices can be used as reference or examples.
If you need some support/help to build your own config file, the best is to use the Discussions forum,
and of course we are counting on you to make the config file available for others.
Tuya TS0601 devices: devices using the Zigbee model TS0601 communicate through a manufacturer-private cluster (0xEF00) and Data Points (DPs) instead of standard cluster attributes. They have their own dedicated guide: Integrate Tuya TS0601 Devices with the Plugin.
Properties
Level
Object Name
default
Description
main
ClusterId
Cluster ID defined in this json file
main
Description
Description of the Cluster ID
main
Version
Version number of this cluster definition
main
Enabled
Is this Cluster definition enabled or not
main
Attributes
list of Attribute and their definition
attribute
xxxx
Object describing attribute xxxx of ClusterId
attribute
Enabled
Is this attribute definition enabled or not
attribute
Name
Name of the attribute
attribute
DataType
Attribute data type in hexa (see the DataType reference)
attribute
Range
Attribute value ranges in hexa
attribute
Acc
Attribute access right (RP: Reporting, R: read, W: write)
attribute
Default
Attribute default value
attribute
Mandatory
Attribute mandatory flag.
attribute
DomoClusterType
Plugin ClusterType info ( Lux, Switch, Motion, …)
attribute
EvalExp
value
string containing a formula to compute the attribute value. Based on the python3 eval() function
attribute
EvalFunc
Function name defined in a module in the DevicesModules (see Device module for more info.)
attribute
ActionList
List of action(s) to be triggered
attribute
DecodedValueList
List of values with a decoded value in string
attribute
SpecialValues
List of special values
attribute
ValidValuesDomoDevices
True
Evaluation which should return True or False, and which will condition the MajDomoDevice call
attribute
DomoDeviceFormat
result of eval
format on how the value should be formatted before being sent to majDomoDevice ( str, float, int )
attribute
UpdDomoDeviceWithCluster
Force to do the majDomoDevice on a specified Cluster, despite the current cluster
attribute
UpdDomoDeviceWithAttribute
none
Force to do the majDomoDevice on a specific attribute
attribute
UpdDomoDeviceWithEp
none
Force to do the majDomoDevice on a specific endpoint, despite the current endpoint
attribute
ValueOverwrite
Overwrite the value, by the one given here
attribute
EvalExpCustomVariables
list of variables to be retrieved in the device. {"yyy": { "ClusterId": "0403", "AttributeId": "0014"}}
EvalExpCustomVariables
yyyy
variable name to be used in the EvalExp string
EvalExpCustomVariables
ClusterId
cluster from which the variable value should be retrieved
EvalExpCustomVariables
AttributeId
attribute from which the variable should be retrieved
attribute
ManufRawData
Use in conjunction with ManufSpecificFunc and indicates that we must use the raw value and not the decoded one
attribute
ManufSpecificFunc
Define a function from the device module to be called
attribute
SpecifStoragelvl1
Use in conjunction of the action store_specif_attribute and define the Name of the corresponding level in the data structure
attribute
SpecifStoragelvl2
Use in conjunction of the action store_specif_attribute and define the Name of the corresponding level in the data structure
attribute
SpecifStoragelvl3
Use in conjunction of the action store_specif_attribute and define the Name of the corresponding level in the data structure
ActionList
name
function
check_store_value
check the value and store it to the corresponding Ep, Cluster, Attribute
check_store_raw_value
same as check_store_value but stores the raw (undecoded) value
upd_domo_device
request an update of the corresponding ClusterType for this value of Cluster
store_specif_attribute
request to store the value under the hierarchy SpecifStoragelvl1:SpecifStoragelvl2:SpecifStoragelvl3
basic_model_name
reserved to handle the attribute 0005 of Basic cluster
update_battery
request an update of the battery level
update_battery_voltage
request an update of the battery level from a voltage value (uses MinBatteryVoltage / MaxBatteryVoltage)
update_battery_percentage
request an update of the battery level from a percentage value
evaluation
- value is a special variable which contains the zigbee device value
- the formula is provided through the EvalExp attribute
-
Transform a centi-degree value into degree
"EvalExp": "round(int(value) / 100, 1)"
-
transform the received data ( value ) into the Atmo Pressure as per the Zigbee standard
"EvalExp": "round(int(value) * pow( 10, scale), 1)"
-
transform the Scaled Pressure measurement.
- retrieve the scale in attribute 0x0014 of cluster 0x0403
- evaluate the formula with the retrieved scale information
 {
  "EvalExpCustomVariables": {"scale": { "ClusterId": "0403", "AttributeId": "0014"}},
  "EvalExp": "round(int(value) * pow( 10, scale), 1)"
 }
Value decoding and validation
In addition to EvalExp, several attribute properties let you decode, validate or remap the received value. They are applied in this order: SpecialValues → Range → DecodedValueList / ManufSpecificFunc / EvalExp+EvalFunc → ActionList.
DecodedValueList
Maps a raw received value to a decoded value (typically a human-readable string). If the received value matches a key in the list, it is replaced by the corresponding value before being stored or sent to Domoticz.
"0000": {
    "Enabled": true,
    "Name": "Contact",
    "DataType": "10",
    "DecodedValueList": { "0": "Closed", "1": "Open" },
    "ActionList": [ "check_store_value", "upd_domo_device" ]
}
Range
Defines the valid range for the attribute value. A value outside the declared range is considered invalid and is silently dropped (no store, no Domoticz update). This is useful to filter out erratic readings. Out-of-range values are logged as warnings only when the TrackingEraticValue plugin option is enabled.
SpecialValues
Declares values that need a special handling (for example a “no data” / “invalid” sentinel sent by the device) so they are not treated as a regular measurement.
EvalFunc
When a transformation is too complex for a single EvalExp expression, reference a helper function instead. EvalFunc points to a key declared in the FUNCTION_MODULE dictionary of DevicesModules/__init__.py (see the Device module section). The helper receives the value and returns the computed value (returning None skips the update). Unlike ManufSpecificFunc, an EvalFunc only computes a value and does not trigger its own actions.
"0400": {
    "Enabled": true,
    "Name": "InstantPower",
    "DataType": "23",
    "EvalFunc": "compute_metering_conso",
    "ActionList": [ "check_store_value", "upd_domo_device" ]
}
DataType reference
DataType is the Zigbee ZCL data type of the attribute, expressed in hexadecimal (without the 0x prefix). The most commonly used values are:
DataType
ZCL type
Notes
10Boolean
0 / 1
188-bit bitmap
1916-bit bitmap
20unsigned int 8-bit
21unsigned int 16-bit
22unsigned int 24-bit
23unsigned int 32-bit
25unsigned int 48-bit
28signed int 8-bit
29signed int 16-bit
most temperature / humidity / pressure attributes
2asigned int 24-bit
2bsigned int 32-bit
308-bit enumeration
3116-bit enumeration
39single precision float
41octet string
42character string
48array
4cstructure
e.g. Lumi/Xiaomi private attribute 0xff02
Device module
overview
instead of using EvalExp which is limited to simple expressions, you can implement a full python function to handle the value as an input and return the result.
If returning None, no action will be taken.
How-to
- Create your python3 module file in the
DevicesModules folder
-
Code your custom function in the <manufacturer>.py module
- The function can take only 2 parameters
self and value
- The function must return something
 def custom_<manufacturer>_function(self, value):

     return value
- Integrate the function in the flow
- Edit the file
DevicesModules/__init__.py, just follow the same as what has already been done
- import your module
- link the function to the stanza you will put in the conf file
 FUNCTION_WITH_ACTIONS_MODULE = {
     # Lumi 0xfcc
     "Lumi_fcc0": lumi_private_cluster,

     # ZLinky
     "zlinky_clusters": zlinky_clusters

 }
 FUNCTION_MODULE = {
     # 0702 helper
     "compute_metering_conso": compute_metering_conso,

     # 0b04 helper
     "compute_electrical_measurement_conso": compute_electrical_measurement_conso,

     # Konke Switch
     "konke_onoff": konke_onoff,
 }
FUNCTION_MODULE holds helpers referenced by EvalFunc (compute and return a value). FUNCTION_WITH_ACTIONS_MODULE holds helpers referenced by ManufSpecificFunc (handle the value and trigger their own actions, e.g. the Lumi private cluster).
Optimize a non-yet optimized device
It is likely that your device - if fully Zigbee 3.0 compliant - works well with the plugin. It means that you have paired the device, and automatically the plugin made a discovery of the device features and created the corresponding domoticz widgets.
In that case, it might be efficient to get the plugin fully aware of what the device is and is not capable of.
To do so, you have to create a ‘config’ file under the Conf/Certified/00Local folder.
-
First you need to extract raw device information from the plugin.
- open the WebUI and go to the Device Management section
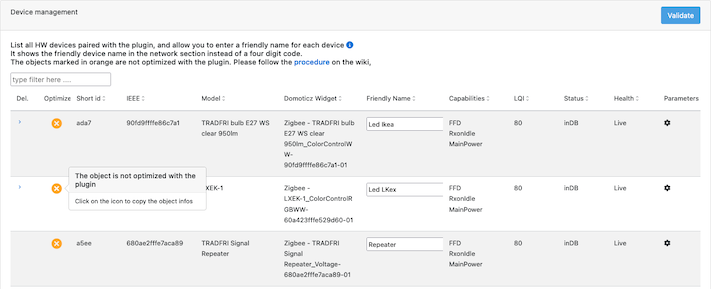
-
as shown on the screenshot here above you’ll see a list of devices, and the ones with the yellow icon refer to devices for which there is no associated config file for the plugin and their behavior might not be optimum.
-
Click on the yellow icon, it will copy immediately the necessary information to the Clipboard. You can then paste it in a Json viewer ( like that one JsonViewer ). You will see a result like this one

-
Create the configuration file for this device
- You have to create the file under the
Conf/Certified/00Local folder
- You have to create the file with a specific name. The name is based on the Zigbee Model identifier you can get in the json file, look at attribute
Model, and create the file as modelname.json.
for example if we look at the Json file above, the Zigbee model identifier is lumi.weather, so you will create a file named Conf/Certified/00Local/lumi.weather.json
you can initialize the file with the following content, that we will show how to update in the next steps
 {
     "_comment": "",
     "_blakadder": "",
     "_version": "",
     "Ep": {
         "01": {
             "0000": "",
             "Type": ""
         }
     },
     "Type": "",
     "ClusterToBind": [],
     "ConfigureReporting": {},
     "ReadAttributes": {},
     "Param": {}
 }
-
Update the attributes
- “_comment”: put whatever comment you would like. We recommend to put at least the Device Product Name and manufacturer.
- “_blakadder”: you can add here the link to the blakadder web site, where your device is referenced. If the device is not yet referenced, we strongly recommend you to request to get it in.
- “_version”: this is a version number you can put.
-
Update the “Ep” section
Here we have to declare what are the Endpoints (EP) the device has and what are the Clusters available on each of the EP. For more information on Ep and Clusters I suggest you look at the Zigbee technical presentation
During pairing, the plugin started a discovery process and interviewed the device for the list of endpoints, and the supported clusters for each of the endpoints. This information will be found in the Json.
In the example here after you can see a somehow complex device which has 3 endpoints.
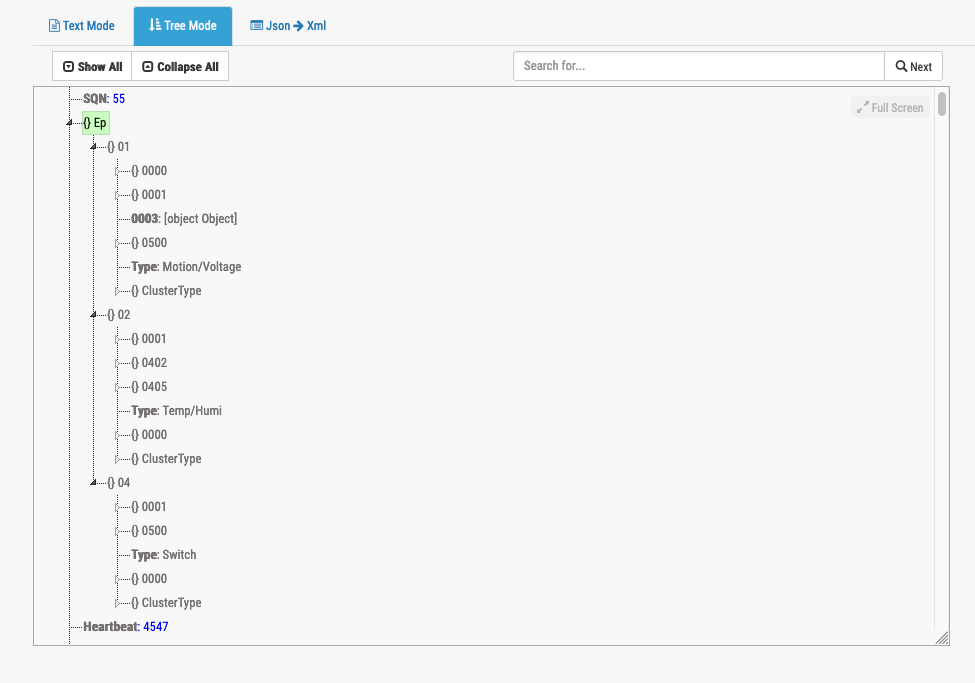
We can see:
3 Endpoints : 0x01, 0x02 and 0x04 and we see for each of the ep the associated cluster.
This will result in the following config file where for each Endpoint we have listed the available cluster and we have also defined what are the associated Domoticz Widgets.
 {
     "Ep": {
         "01": {
             "0000": "",
             "0001": "",
             "0003": "",
             "0500": "",
             "Type": "Motion/Voltage"
         },
         "02": {
             "0001": "",
             "0402": "",
             "0405": "",
             "Type": "Temp/Humi"
         },
         "04": {
             "0001": "",
             "0500": "",
             "Type": "Switch"
         }
     },
     "Type": "",
Ep
Widget
Cluster source of information
01
Motion
The motion detection will come from the Cluster 0x0500 ( IAS ), Domoticz will switch the Motion widget from On to Off depending on the notification
Voltage
The device will send voltage information via the cluster 0x0001 ( Power ), and domoticz will display the voltage value
02
Temperature
The device will send Temperature information via cluster 0x0402
Humidity
Humidity info will be provided from cluster 0x0405
04
Switch
The device offers the possibility to detect vibration on cluster 04 and the cluster 0500 will be used for it
if you look at the Json you could say that there are fewer clusters than the reality discovered by the plugin.
Indeed, cluster 0x0000 is mentioned only once on the Ep 01, which we consider sufficient and there is no need to get the same information across several Ep.
In summary Type corresponds to the Domoticz Widget to be created and used to display sensor information as well as handling actions
More information on the Cluster -> Widget
-
Update the ClusterToBind section
A Binding is the creation of a unidirectional logical link between a source endpoint/cluster identifier pair and a destination endpoint.
It might be needed to establish a binding between the device and the coordinator in order to receive automatic reports such as sensor information.
In "ClusterToBind": [ ] you will be able to list the clusters to be bound with the coordinator. By default, the plugin looks at the Endpoint list (Ep) and will establish a bind for each of the Ep/Cluster existing.
In case you have a multiple Ep device which serves the same cluster, you might want to restrict the binding to only a specific Ep. In such case you can use "bindEp": [ ]
If we follow the CMS323 device, we need to bind 01/0001, 02/0001, 04/0001, 02/0402, 02/0405
"ClusterToBind": [ "0001", "0402", "0405" ],
-
Update the ConfigureReporting section
The Configure Reporting command is used to configure the reporting mechanism for one or more of the attributes of a cluster.
Usually in order to put in place a Configure Reporting command, a corresponding binding needs to be done as well.
 "ConfigureReporting": {
     "0001": { "Attributes": { "0021": { "DataType": "20", "MinInterval": "0E10", "MaxInterval": "A8C0", "TimeOut": "0000", "Change": "01" } }},
     "0402": { "Attributes": { "0000": { "DataType": "29", "MinInterval": "003C", "MaxInterval": "0384", "TimeOut": "0000", "Change": "0032" } } },
     "0405": { "Attributes": { "0000": { "DataType": "21", "MinInterval": "003C", "MaxInterval": "0384", "TimeOut": "0000", "Change": "0032" } } }
 },
-
Update the ReadAttributes section
The Read Attribute command is used to query the device on attributes.
In this section we are going to indicate to the plugin which Cluster/Attributes are valid and can be queried.
 "ReadAttributes": {
     "0000": ["0004","0005","0006","0007"],
     "0001": [ "0020" ],
     "0003": [],
     "0402": [ "0000" ],
     "0405": [ "0000" ],
     "0500": [ "0000", "0001", "0002", "0010", "0011" ]
 },
-
Additional parameters
Parameter
Description
ActivePowerDivisor
Divisor to be used when receiving Active Power via Cluster 0x0b04 and Attribute 0x050b
BatteryDevice
specify that the device is a battery based device and must be treated as such
BatteryPercentageConverter
the value will be used to divide the value sent by the device. e.g. if we receive 156, and we set BatteryPercentageConverter = 2, this will convert into 78%
BatteryPoweredDevice
Used to indicate despite what the device tells, it is a Battery powered device
CreateWidgetDomoticz
IgnoreWindowsCoverringValue50
MainPoweredDevice
Used to indicate despite what the device tells, it is a Main powered device
MaxBatteryVoltage
define the max battery voltage, which has to be expressed with the same unit as the incoming info
MeteringUnit
Unit of measure on the Metering cluster kW (means that we have to x 1000 to send to Domoticz), Unitless (means that we have Watts and we can send it like that)
MinBatteryVoltage
define the min battery voltage, which has to be expressed with the same unit as the incoming info
PowerMeteringDivisor
Divisor to be used when receiving Instant Power via Cluster 0x0702 and Attribute 0x0400
PowerMeteringMultiplier
Multiplier to be used when receiving Instant Power via Cluster 0x0702 and Attribute 0x0400
PowerOnOffStateAttribute8002
RMSCurrentDivisor
Divisor to be used when receiving RMS Current via Cluster 0x0b04 and Attribute 0x0508
RMSVoltageDivisor
Divisor to be used when receiving RMS Voltage via Cluster 0x0b04 and Attribute 0x0505, 0x0905, 0x0a05
SummationMeteringDivisor
Divisor to be used when receiving Summation Power via Cluster 0x0702 and Attribute 0x0000
SummationMeteringMultiplier
Multiplier to be used when receiving Summation Power via Cluster 0x0702 and Attribute 0x0000
TUYA_REGISTRATION
TUYA_REMOTE
VoltageConverter
the value will be used to divide the value sent by the device. e.g. if we receive 22450, and we set VoltageConverter = 100, this will convert into 224.5 Volts
WindowsCoverringInverted
Widget Type
“Type” is used to define the list of Widget Type (also named Device in domoticz). You can define a list of Widgets to be created by combining several types separated by /
For example
"Type": "Baro/Temp/Humi"
Would create 5 widgets in Domoticz:
- Barometer
- Temperature
- Humidity
- Temperature/humidity (combining Temperature and Humidity)
- Temperature/humidity/barometer ( combining Temperature, Humidity and Barometer)
Type
Description
AirPurifierAlarm
AirQuality
Alarm
Ampere
Ampere3
Analog
Baro
Button
CarbonDioxyde
CarbonMonoxyde
CH2O
ColorControlFull
ColorControlRGB
ColorControlRGBW
ColorControlRGBWW
ColorControlRGBWZ
ColorControlWW
ConsoMeter
Counter
Distance
Door
DoorLock
DoorSensor
FanSpeed
GazMeter
HeatingStatus
HeatingSwitch
Humi
Lux
LvlControl
Meter
Motion
Notification
Orientation
P1Meter
PAC-SWITCH
Plug
PM25
Power
PowerFactor
ProdMeter
ProdPower
ShutterCalibration
Smoke
SmokePPM
Strength
Switch
SwitchAlarm
SwitchButton
Tamper
TamperSwitch
Temp
Temp+Hum
Temp+Hum+Baro
ThermoOnOff
ThermoSetpoint
TuyaDoorLock
Valve
Voc
Voltage
Water
WaterCounter
A concrete example: lumi Weather
{
    "Ep": {
        "01": {
            "0000": {
                "Attributes": {
                    "fff0": { "Enabled": true, "Name": "Aqara_0000_fff0", "DataType": "42" , "ManufRawData": true, "ManufSpecificFunc": "Lumi_fcc0", "ActionList": [ "check_store_value"]},
                    "ff01": { "Enabled": true, "Name": "Aqara_0000_ff01", "DataType": "42" , "ManufRawData": true, "ManufSpecificFunc": "Lumi_fcc0", "ActionList": [ "check_store_value"]},
                    "ff02": { "Enabled": true, "Name": "Aqara_0000_ff02", "DataType": "4c" , "ManufRawData": true, "ManufSpecificFunc": "Lumi_fcc0", "ActionList": [ "check_store_value"]}
                }
            },
            "0003": "",
            "0402": "",
            "0403": {
                "Attributes": {
                    "0000": { "Enabled": true, "Name": "Aqara MeasuredValue","DataType": "29" , "DomoClusterType": "Baro","ActionList": [ "check_store_value"]},
                    "0010": { "Enabled": true, "Name": "Aqara ScaledValue", "DataType": "29" , "EvalExp": "round(int(value) / 10, 1)", "ActionList": [ "check_store_value", "upd_domo_device"]},
                    "0014": { "Enabled": true, "Name": "Aqara Scale", "DataType": "28", "ActionList": [ "check_store_value"] }
                }
            },
            "0405": "",
            "ffff": "",
            "Type": "Temp/Humi/Baro"
        }
    },
    "Type": "",
    "ClusterToBind": [],
    "ConfigureReporting": {},
    "ReadAttributes": {
        "0000": [ "0004", "0005" ],
        "0402": [],
        "0403": [],
        "0405": []
    }
}
In this example we can note in addition to what was explained before:
-
For attributes 0xfff0, 0xff01, 0xff02 of Cluster 0x0000 we are delegating the handling to a specific function Lumi_fcc0.
The reason is that Lumi uses those attributes to pass various information like Battery level, On/Off state for Door sensor and plenty of other infos.
-
For attribute 0x0000 of 0x0403 we are just storing the received info. Usually this attribute is used to provide the Pressure, but in the case of Lumi, we are using attribute 0x0010.
-
For attribute 0x0010 of 0x0403, we are going to send this value to domoticz via the upd_domo_device call. But prior to that we are performing a calculation round(int(value) / 10, 1).
Testing your configuration
- Copy your JSON file to the plugin’s local config folder (
Conf/Certified/00Local) for your own devices, or to the matching Certified/<Manufacturer> folder of the z4d-certified-devices module when contributing.
- Restart the plugin (or re-pair the device) so it re-reads the configuration files.
- Check the plugin logs for the device pairing/import messages and confirm the configuration was loaded for your Model.
- Trigger each sensor or action on the physical device and verify the corresponding Domoticz widget updates correctly.
- If an attribute is received but nothing happens, double-check the
Enabled flag, the DataType, the ActionList, and (if used) the Range — an out-of-range value is dropped silently.
- Enable the
TrackingEraticValue plugin option if you suspect values are being filtered by Range; out-of-range values will then be logged as warnings.
Contributing
Once your configuration works, please share it so other users benefit:
- Open a Pull Request on z4d-certified-devices with your JSON file under the appropriate
z4d_certified_devices/Certified/<Manufacturer>/ folder.
- Make sure the device is referenced on blakadder and fill the
_blakadder field.
- Populate
_comment (device product name and manufacturer) and _version.
- If you need help, use the Discussions forum.
How-To get devices well integrated with the plugin
Overview
It might happen that your device is well paired with the coordinator and the plugin, but does not behave as expected. The plugin provides a way to overwrite the Zigbee standard behavior by adding specifics to the device plugin configuration.
Since plugin version 6.4.4xx, the device config files have moved out of the plugin core engine to a specific python module ( z4d-certified-devices ). This allows more frequent updates of config files without touching the plugin core engine.
The source code of the z4d-certified-devices can be used as reference or examples.
If you need some support/help to build your own config file, the best is to use the Discussions forum, and of course we are counting on you to make the config file available for others.
Tuya TS0601 devices: devices using the Zigbee model
TS0601communicate through a manufacturer-private cluster (0xEF00) and Data Points (DPs) instead of standard cluster attributes. They have their own dedicated guide: Integrate Tuya TS0601 Devices with the Plugin.
Properties
| Level | Object Name | default | Description |
|---|---|---|---|
| main | ClusterId | Cluster ID defined in this json file | |
| main | Description | Description of the Cluster ID | |
| main | Version | Version number of this cluster definition | |
| main | Enabled | Is this Cluster definition enabled or not | |
| main | Attributes | list of Attribute and their definition | |
| attribute | xxxx | Object describing attribute xxxx of ClusterId | |
| attribute | Enabled | Is this attribute definition enabled or not | |
| attribute | Name | Name of the attribute | |
| attribute | DataType | Attribute data type in hexa (see the DataType reference) | |
| attribute | Range | Attribute value ranges in hexa | |
| attribute | Acc | Attribute access right (RP: Reporting, R: read, W: write) | |
| attribute | Default | Attribute default value | |
| attribute | Mandatory | Attribute mandatory flag. | |
| attribute | DomoClusterType | Plugin ClusterType info ( Lux, Switch, Motion, …) | |
| attribute | EvalExp | value | string containing a formula to compute the attribute value. Based on the python3 eval() function |
| attribute | EvalFunc | Function name defined in a module in the DevicesModules (see Device module for more info.) | |
| attribute | ActionList | List of action(s) to be triggered | |
| attribute | DecodedValueList | List of values with a decoded value in string | |
| attribute | SpecialValues | List of special values | |
| attribute | ValidValuesDomoDevices | True | Evaluation which should return True or False, and which will condition the MajDomoDevice call |
| attribute | DomoDeviceFormat | result of eval | format on how the value should be formatted before being sent to majDomoDevice ( str, float, int ) |
| attribute | UpdDomoDeviceWithCluster | Force to do the majDomoDevice on a specified Cluster, despite the current cluster | |
| attribute | UpdDomoDeviceWithAttribute | none | Force to do the majDomoDevice on a specific attribute |
| attribute | UpdDomoDeviceWithEp | none | Force to do the majDomoDevice on a specific endpoint, despite the current endpoint |
| attribute | ValueOverwrite | Overwrite the value, by the one given here | |
| attribute | EvalExpCustomVariables | list of variables to be retrieved in the device. {"yyy": { "ClusterId": "0403", "AttributeId": "0014"}} |
|
| EvalExpCustomVariables | yyyy | variable name to be used in the EvalExp string | |
| EvalExpCustomVariables | ClusterId | cluster from which the variable value should be retrieved | |
| EvalExpCustomVariables | AttributeId | attribute from which the variable should be retrieved | |
| attribute | ManufRawData | Use in conjunction with ManufSpecificFunc and indicates that we must use the raw value and not the decoded one | |
| attribute | ManufSpecificFunc | Define a function from the device module to be called | |
| attribute | SpecifStoragelvl1 | Use in conjunction of the action store_specif_attribute and define the Name of the corresponding level in the data structure | |
| attribute | SpecifStoragelvl2 | Use in conjunction of the action store_specif_attribute and define the Name of the corresponding level in the data structure | |
| attribute | SpecifStoragelvl3 | Use in conjunction of the action store_specif_attribute and define the Name of the corresponding level in the data structure |
ActionList
| name | function |
|---|---|
| check_store_value | check the value and store it to the corresponding Ep, Cluster, Attribute |
| check_store_raw_value | same as check_store_value but stores the raw (undecoded) value |
| upd_domo_device | request an update of the corresponding ClusterType for this value of Cluster |
| store_specif_attribute | request to store the value under the hierarchy SpecifStoragelvl1:SpecifStoragelvl2:SpecifStoragelvl3 |
| basic_model_name | reserved to handle the attribute 0005 of Basic cluster |
| update_battery | request an update of the battery level |
| update_battery_voltage | request an update of the battery level from a voltage value (uses MinBatteryVoltage / MaxBatteryVoltage) |
| update_battery_percentage | request an update of the battery level from a percentage value |
evaluation
- value is a special variable which contains the zigbee device value
- the formula is provided through the EvalExp attribute
-
Transform a centi-degree value into degree
"EvalExp": "round(int(value) / 100, 1)" -
transform the received data ( value ) into the Atmo Pressure as per the Zigbee standard
"EvalExp": "round(int(value) * pow( 10, scale), 1)" -
transform the Scaled Pressure measurement.
- retrieve the scale in attribute 0x0014 of cluster 0x0403
- evaluate the formula with the retrieved scale information
{ "EvalExpCustomVariables": {"scale": { "ClusterId": "0403", "AttributeId": "0014"}}, "EvalExp": "round(int(value) * pow( 10, scale), 1)" }
Value decoding and validation
In addition to EvalExp, several attribute properties let you decode, validate or remap the received value. They are applied in this order: SpecialValues → Range → DecodedValueList / ManufSpecificFunc / EvalExp+EvalFunc → ActionList.
DecodedValueList
Maps a raw received value to a decoded value (typically a human-readable string). If the received value matches a key in the list, it is replaced by the corresponding value before being stored or sent to Domoticz.
"0000": {
"Enabled": true,
"Name": "Contact",
"DataType": "10",
"DecodedValueList": { "0": "Closed", "1": "Open" },
"ActionList": [ "check_store_value", "upd_domo_device" ]
}
Range
Defines the valid range for the attribute value. A value outside the declared range is considered invalid and is silently dropped (no store, no Domoticz update). This is useful to filter out erratic readings. Out-of-range values are logged as warnings only when the TrackingEraticValue plugin option is enabled.
SpecialValues
Declares values that need a special handling (for example a “no data” / “invalid” sentinel sent by the device) so they are not treated as a regular measurement.
EvalFunc
When a transformation is too complex for a single EvalExp expression, reference a helper function instead. EvalFunc points to a key declared in the FUNCTION_MODULE dictionary of DevicesModules/__init__.py (see the Device module section). The helper receives the value and returns the computed value (returning None skips the update). Unlike ManufSpecificFunc, an EvalFunc only computes a value and does not trigger its own actions.
"0400": {
"Enabled": true,
"Name": "InstantPower",
"DataType": "23",
"EvalFunc": "compute_metering_conso",
"ActionList": [ "check_store_value", "upd_domo_device" ]
}
DataType reference
DataType is the Zigbee ZCL data type of the attribute, expressed in hexadecimal (without the 0x prefix). The most commonly used values are:
| DataType | ZCL type | Notes |
|---|---|---|
10 |
Boolean | 0 / 1 |
18 |
8-bit bitmap | |
19 |
16-bit bitmap | |
20 |
unsigned int 8-bit | |
21 |
unsigned int 16-bit | |
22 |
unsigned int 24-bit | |
23 |
unsigned int 32-bit | |
25 |
unsigned int 48-bit | |
28 |
signed int 8-bit | |
29 |
signed int 16-bit | most temperature / humidity / pressure attributes |
2a |
signed int 24-bit | |
2b |
signed int 32-bit | |
30 |
8-bit enumeration | |
31 |
16-bit enumeration | |
39 |
single precision float | |
41 |
octet string | |
42 |
character string | |
48 |
array | |
4c |
structure | e.g. Lumi/Xiaomi private attribute 0xff02 |
Device module
overview
instead of using EvalExp which is limited to simple expressions, you can implement a full python function to handle the value as an input and return the result. If returning None, no action will be taken.
How-to
- Create your python3 module file in the
DevicesModulesfolder -
Code your custom function in the <manufacturer>.py module
- The function can take only 2 parameters
selfandvalue - The function must return something
def custom_<manufacturer>_function(self, value): return value - The function can take only 2 parameters
- Integrate the function in the flow
- Edit the file
DevicesModules/__init__.py, just follow the same as what has already been done- import your module
- link the function to the stanza you will put in the conf file
FUNCTION_WITH_ACTIONS_MODULE = { # Lumi 0xfcc "Lumi_fcc0": lumi_private_cluster, # ZLinky "zlinky_clusters": zlinky_clusters } FUNCTION_MODULE = { # 0702 helper "compute_metering_conso": compute_metering_conso, # 0b04 helper "compute_electrical_measurement_conso": compute_electrical_measurement_conso, # Konke Switch "konke_onoff": konke_onoff, } - Edit the file
FUNCTION_MODULEholds helpers referenced by EvalFunc (compute and return a value).FUNCTION_WITH_ACTIONS_MODULEholds helpers referenced by ManufSpecificFunc (handle the value and trigger their own actions, e.g. the Lumi private cluster).
Optimize a non-yet optimized device
It is likely that your device - if fully Zigbee 3.0 compliant - works well with the plugin. It means that you have paired the device, and automatically the plugin made a discovery of the device features and created the corresponding domoticz widgets.
In that case, it might be efficient to get the plugin fully aware of what the device is and is not capable of.
To do so, you have to create a ‘config’ file under the Conf/Certified/00Local folder.
-
First you need to extract raw device information from the plugin.
- open the WebUI and go to the Device Management section
-
as shown on the screenshot here above you’ll see a list of devices, and the ones with the yellow icon refer to devices for which there is no associated config file for the plugin and their behavior might not be optimum.
-
Click on the yellow icon, it will copy immediately the necessary information to the Clipboard. You can then paste it in a Json viewer ( like that one JsonViewer ). You will see a result like this one
-
Create the configuration file for this device
- You have to create the file under the
Conf/Certified/00Localfolder - You have to create the file with a specific name. The name is based on the Zigbee Model identifier you can get in the json file, look at attribute
Model, and create the file as modelname.json.
for example if we look at the Json file above, the Zigbee model identifier is lumi.weather, so you will create a file named Conf/Certified/00Local/lumi.weather.json
you can initialize the file with the following content, that we will show how to update in the next steps
{ "_comment": "", "_blakadder": "", "_version": "", "Ep": { "01": { "0000": "", "Type": "" } }, "Type": "", "ClusterToBind": [], "ConfigureReporting": {}, "ReadAttributes": {}, "Param": {} } - You have to create the file under the
-
Update the attributes
- “_comment”: put whatever comment you would like. We recommend to put at least the Device Product Name and manufacturer.
- “_blakadder”: you can add here the link to the blakadder web site, where your device is referenced. If the device is not yet referenced, we strongly recommend you to request to get it in.
- “_version”: this is a version number you can put.
-
Update the “Ep” section
Here we have to declare what are the Endpoints (EP) the device has and what are the Clusters available on each of the EP. For more information on Ep and Clusters I suggest you look at the Zigbee technical presentation
During pairing, the plugin started a discovery process and interviewed the device for the list of endpoints, and the supported clusters for each of the endpoints. This information will be found in the Json.
In the example here after you can see a somehow complex device which has 3 endpoints.
We can see:
3 Endpoints : 0x01, 0x02 and 0x04 and we see for each of the ep the associated cluster.
This will result in the following config file where for each Endpoint we have listed the available cluster and we have also defined what are the associated Domoticz Widgets.
{ "Ep": { "01": { "0000": "", "0001": "", "0003": "", "0500": "", "Type": "Motion/Voltage" }, "02": { "0001": "", "0402": "", "0405": "", "Type": "Temp/Humi" }, "04": { "0001": "", "0500": "", "Type": "Switch" } }, "Type": "",Ep Widget Cluster source of information 01 Motion The motion detection will come from the Cluster 0x0500 ( IAS ), Domoticz will switch the Motion widget from On to Off depending on the notification Voltage The device will send voltage information via the cluster 0x0001 ( Power ), and domoticz will display the voltage value 02 Temperature The device will send Temperature information via cluster 0x0402 Humidity Humidity info will be provided from cluster 0x0405 04 Switch The device offers the possibility to detect vibration on cluster 04 and the cluster 0500 will be used for it if you look at the Json you could say that there are fewer clusters than the reality discovered by the plugin. Indeed, cluster 0x0000 is mentioned only once on the Ep 01, which we consider sufficient and there is no need to get the same information across several Ep.
In summary Type corresponds to the Domoticz Widget to be created and used to display sensor information as well as handling actions
More information on the Cluster -> Widget
-
Update the ClusterToBind section
A Binding is the creation of a unidirectional logical link between a source endpoint/cluster identifier pair and a destination endpoint.
It might be needed to establish a binding between the device and the coordinator in order to receive automatic reports such as sensor information.
In
"ClusterToBind": [ ]you will be able to list the clusters to be bound with the coordinator. By default, the plugin looks at the Endpoint list (Ep) and will establish a bind for each of the Ep/Cluster existing.In case you have a multiple Ep device which serves the same cluster, you might want to restrict the binding to only a specific Ep. In such case you can use
"bindEp": [ ]If we follow the CMS323 device, we need to bind 01/0001, 02/0001, 04/0001, 02/0402, 02/0405
"ClusterToBind": [ "0001", "0402", "0405" ], -
Update the ConfigureReporting section
The Configure Reporting command is used to configure the reporting mechanism for one or more of the attributes of a cluster. Usually in order to put in place a Configure Reporting command, a corresponding binding needs to be done as well.
"ConfigureReporting": { "0001": { "Attributes": { "0021": { "DataType": "20", "MinInterval": "0E10", "MaxInterval": "A8C0", "TimeOut": "0000", "Change": "01" } }}, "0402": { "Attributes": { "0000": { "DataType": "29", "MinInterval": "003C", "MaxInterval": "0384", "TimeOut": "0000", "Change": "0032" } } }, "0405": { "Attributes": { "0000": { "DataType": "21", "MinInterval": "003C", "MaxInterval": "0384", "TimeOut": "0000", "Change": "0032" } } } }, -
Update the ReadAttributes section
The Read Attribute command is used to query the device on attributes. In this section we are going to indicate to the plugin which Cluster/Attributes are valid and can be queried.
"ReadAttributes": { "0000": ["0004","0005","0006","0007"], "0001": [ "0020" ], "0003": [], "0402": [ "0000" ], "0405": [ "0000" ], "0500": [ "0000", "0001", "0002", "0010", "0011" ] }, -
Additional parameters
Parameter Description ActivePowerDivisor Divisor to be used when receiving Active Power via Cluster 0x0b04 and Attribute 0x050b BatteryDevice specify that the device is a battery based device and must be treated as such BatteryPercentageConverter the value will be used to divide the value sent by the device. e.g. if we receive 156, and we set BatteryPercentageConverter = 2, this will convert into 78%BatteryPoweredDevice Used to indicate despite what the device tells, it is a Battery powered device CreateWidgetDomoticz IgnoreWindowsCoverringValue50 MainPoweredDevice Used to indicate despite what the device tells, it is a Main powered device MaxBatteryVoltage define the max battery voltage, which has to be expressed with the same unit as the incoming info MeteringUnit Unit of measure on the Metering cluster kW(means that we have to x 1000 to send to Domoticz),Unitless(means that we have Watts and we can send it like that)MinBatteryVoltage define the min battery voltage, which has to be expressed with the same unit as the incoming info PowerMeteringDivisor Divisor to be used when receiving Instant Power via Cluster 0x0702 and Attribute 0x0400 PowerMeteringMultiplier Multiplier to be used when receiving Instant Power via Cluster 0x0702 and Attribute 0x0400 PowerOnOffStateAttribute8002 RMSCurrentDivisor Divisor to be used when receiving RMS Current via Cluster 0x0b04 and Attribute 0x0508 RMSVoltageDivisor Divisor to be used when receiving RMS Voltage via Cluster 0x0b04 and Attribute 0x0505, 0x0905, 0x0a05 SummationMeteringDivisor Divisor to be used when receiving Summation Power via Cluster 0x0702 and Attribute 0x0000 SummationMeteringMultiplier Multiplier to be used when receiving Summation Power via Cluster 0x0702 and Attribute 0x0000 TUYA_REGISTRATION TUYA_REMOTE VoltageConverter the value will be used to divide the value sent by the device. e.g. if we receive 22450, and we set VoltageConverter = 100, this will convert into 224.5 VoltsWindowsCoverringInverted
Widget Type
“Type” is used to define the list of Widget Type (also named Device in domoticz). You can define a list of Widgets to be created by combining several types separated by /
For example
"Type": "Baro/Temp/Humi"
Would create 5 widgets in Domoticz:
- Barometer
- Temperature
- Humidity
- Temperature/humidity (combining Temperature and Humidity)
- Temperature/humidity/barometer ( combining Temperature, Humidity and Barometer)
| Type | Description |
|---|---|
| AirPurifierAlarm | |
| AirQuality | |
| Alarm | |
| Ampere | |
| Ampere3 | |
| Analog | |
| Baro | |
| Button | |
| CarbonDioxyde | |
| CarbonMonoxyde | |
| CH2O | |
| ColorControlFull | |
| ColorControlRGB | |
| ColorControlRGBW | |
| ColorControlRGBWW | |
| ColorControlRGBWZ | |
| ColorControlWW | |
| ConsoMeter | |
| Counter | |
| Distance | |
| Door | |
| DoorLock | |
| DoorSensor | |
| FanSpeed | |
| GazMeter | |
| HeatingStatus | |
| HeatingSwitch | |
| Humi | |
| Lux | |
| LvlControl | |
| Meter | |
| Motion | |
| Notification | |
| Orientation | |
| P1Meter | |
| PAC-SWITCH | |
| Plug | |
| PM25 | |
| Power | |
| PowerFactor | |
| ProdMeter | |
| ProdPower | |
| ShutterCalibration | |
| Smoke | |
| SmokePPM | |
| Strength | |
| Switch | |
| SwitchAlarm | |
| SwitchButton | |
| Tamper | |
| TamperSwitch | |
| Temp | |
| Temp+Hum | |
| Temp+Hum+Baro | |
| ThermoOnOff | |
| ThermoSetpoint | |
| TuyaDoorLock | |
| Valve | |
| Voc | |
| Voltage | |
| Water | |
| WaterCounter |
A concrete example: lumi Weather
{
"Ep": {
"01": {
"0000": {
"Attributes": {
"fff0": { "Enabled": true, "Name": "Aqara_0000_fff0", "DataType": "42" , "ManufRawData": true, "ManufSpecificFunc": "Lumi_fcc0", "ActionList": [ "check_store_value"]},
"ff01": { "Enabled": true, "Name": "Aqara_0000_ff01", "DataType": "42" , "ManufRawData": true, "ManufSpecificFunc": "Lumi_fcc0", "ActionList": [ "check_store_value"]},
"ff02": { "Enabled": true, "Name": "Aqara_0000_ff02", "DataType": "4c" , "ManufRawData": true, "ManufSpecificFunc": "Lumi_fcc0", "ActionList": [ "check_store_value"]}
}
},
"0003": "",
"0402": "",
"0403": {
"Attributes": {
"0000": { "Enabled": true, "Name": "Aqara MeasuredValue","DataType": "29" , "DomoClusterType": "Baro","ActionList": [ "check_store_value"]},
"0010": { "Enabled": true, "Name": "Aqara ScaledValue", "DataType": "29" , "EvalExp": "round(int(value) / 10, 1)", "ActionList": [ "check_store_value", "upd_domo_device"]},
"0014": { "Enabled": true, "Name": "Aqara Scale", "DataType": "28", "ActionList": [ "check_store_value"] }
}
},
"0405": "",
"ffff": "",
"Type": "Temp/Humi/Baro"
}
},
"Type": "",
"ClusterToBind": [],
"ConfigureReporting": {},
"ReadAttributes": {
"0000": [ "0004", "0005" ],
"0402": [],
"0403": [],
"0405": []
}
}
In this example we can note in addition to what was explained before:
-
For attributes 0xfff0, 0xff01, 0xff02 of Cluster 0x0000 we are delegating the handling to a specific function
Lumi_fcc0. The reason is that Lumi uses those attributes to pass various information like Battery level, On/Off state for Door sensor and plenty of other infos. -
For attribute 0x0000 of 0x0403 we are just storing the received info. Usually this attribute is used to provide the Pressure, but in the case of Lumi, we are using attribute 0x0010.
-
For attribute 0x0010 of 0x0403, we are going to send this value to domoticz via the
upd_domo_devicecall. But prior to that we are performing a calculationround(int(value) / 10, 1).
Testing your configuration
- Copy your JSON file to the plugin’s local config folder (
Conf/Certified/00Local) for your own devices, or to the matchingCertified/<Manufacturer>folder of the z4d-certified-devices module when contributing. - Restart the plugin (or re-pair the device) so it re-reads the configuration files.
- Check the plugin logs for the device pairing/import messages and confirm the configuration was loaded for your Model.
- Trigger each sensor or action on the physical device and verify the corresponding Domoticz widget updates correctly.
- If an attribute is received but nothing happens, double-check the
Enabledflag, theDataType, theActionList, and (if used) theRange— an out-of-range value is dropped silently. - Enable the
TrackingEraticValueplugin option if you suspect values are being filtered byRange; out-of-range values will then be logged as warnings.
Contributing
Once your configuration works, please share it so other users benefit:
- Open a Pull Request on z4d-certified-devices with your JSON file under the appropriate
z4d_certified_devices/Certified/<Manufacturer>/folder. - Make sure the device is referenced on blakadder and fill the
_blakadderfield. - Populate
_comment(device product name and manufacturer) and_version. - If you need help, use the Discussions forum.